This tutorial is an update of a post I originally wrote in 2013. It’s one of the most visited pages on our website and a recent comment prompted me to create an updated post with a solution that works with the latest version of jQuery and uses a modal plugin that is still supported.
This was originally created as an alternative to adding a plugin and is designed to be lean and lightweight. The requirements and functionality are quite simple. However, by using Advanced Custom Fields (ACF) you can pretty much make this support whatever fields or media you require.
Please note for this example I’ve added the functionality to an Options panel. If you want to do it this way you’ll need the Pro version of the plugin, however it can be implemented on the free version.
Step 1 – Create the ACF field group
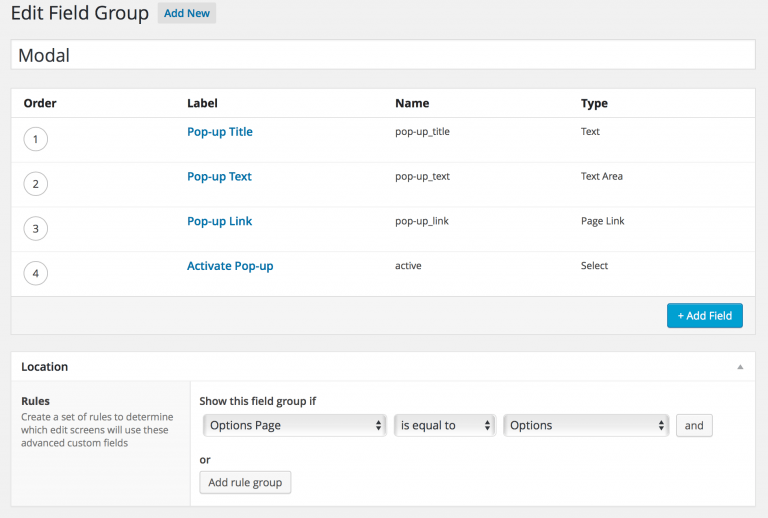
First step is to create the custom field group. The example here contains a few standard field types, including a select field. This was added to enable the user to switch the modal ‘on’ and ‘off’ as required, it also ensures that we can control the loading of the supporting js & css which eliminates the loading of unnecessary resources if it’s not in use.
The following are added as choices to the ‘Select’ field.
When using ACF I always take advantage of the local json support. If you want you can download the json file here and add it to a ‘acf-json’ folder in your theme.
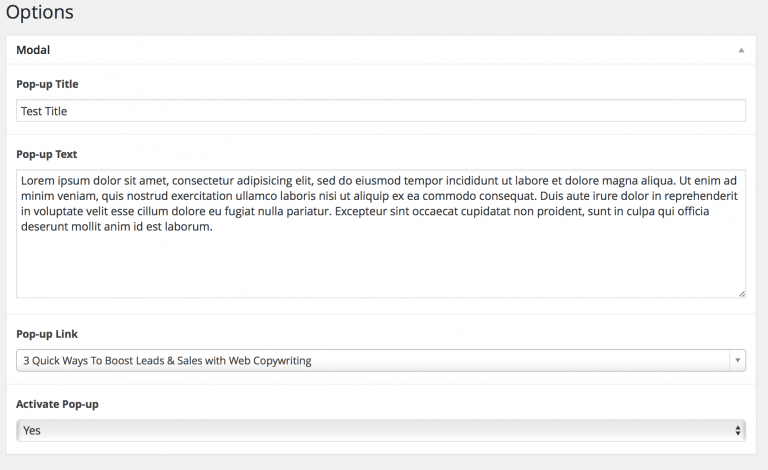
Once add the field is set-up you can then enter the content for the modal in the options panel.
Step 2 – Creating the Template for the WordPress theme
As mentioned prior the active state of the modal is controlled by a select field. In this example I only want the modal to be active on the home page of the website, so the following was added to the header.php template.
<?php
 // check we're on the front page
 if(is_front_page()) {
  // grab the select field data
  $active = get_field('active', 'option');
  // check the selection
  if($active == 'yes') {
   // get the modal code
   get_template_part( 'modal' );
  }
 }
?>
Next the modal.php template was created to display the ACF fields. jQuery Modal is the plugin that I’m using for this example. It was chosen because it is extremely simple & lightweight.
<div id="modal" class="modal" style="display:none;">
  <h1><?php the_field('pop-up_title', 'option') ?></h1>
  <p><?php the_field('pop-up_text', 'option') ?></p>

  <?php if (get_field('pop-up_link', 'option')) { ?>
   <div id="modal-link">
    <a href="<?php the_field ('pop-up_link', 'option')?>" class="modal-more">Find Out More</a>
   </div><!-- #modal-link -->
  <?php } ?>
</div>
Step 3 – Adding js to your WordPress theme
Add the following to the functions.php file. You’ll need to update the file path for ‘jquery.modal.min.js’ as required.
// Works with the latest version of jQuery
if (!is_admin()) {
 wp_deregister_script('jquery'); // Deregister WordPress jQuery
 wp_register_script('jquery', 'https://ajax.googleapis.com/ajax/libs/jquery/3.1.1/jquery.min.js', 'jquery', '3.1.1', true); // Load Google CDN jQuery
 wp_enqueue_script('jquery'); // Enqueue it!
}

// Load modal script
function load_javascript_file() {
 $active = get_field('active', 'option');
  if($active == "yes") {
   wp_register_script('modal', get_template_directory_uri() . '/js/libs/jquery.modal.min.js', 'jquery', '', true);
   wp_enqueue_script('modal');
  }
}
add_action('wp_enqueue_scripts', 'load_javascript_file' );
Step 4 – Firing the modal
In this example I wanted the modal to fire 2 seconds after the page loaded and only on the home page. To achieve this I needed to modify the jQuery function from the default ‘on-click’ option and added the following code to the footer.php template in the theme.
<?php if(is_front_page()) { ?>
<script type="text/javascript">
$(document).ready(function() {
function showpanel(){
$('#modal').modal({
// add the plugin options as required
fadeDuration: 600,
fadeDelay: 0.6,
closeText: '×'
});
}
setTimeout(showpanel, 2000) //set the delay time
});
</script>
<?php } ?>The Result
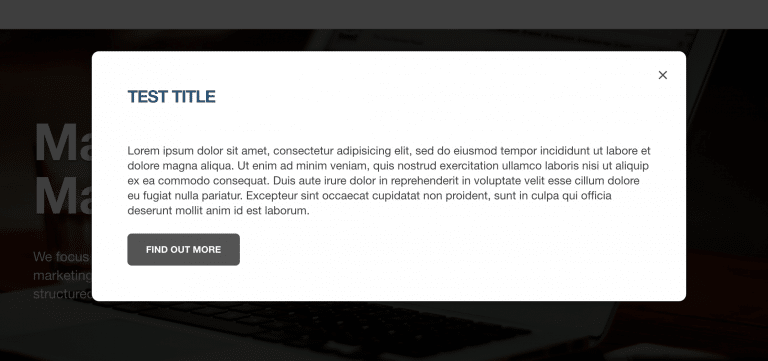
The end result is a simple, lightweight and flexible solution that can be easily modified to suit a variety of requirements.
Styling the modal
The ‘jQuery Modal’ plugin comes with a very simple and lightweight css that is perfectly fine for styling. However, for the example shown above I created a sass file that you could easily be transferred between projects. I’ve added this below.
// Modal options
@mixin border-radius($radius) {
  -webkit-border-radius: $radius;
  -moz-border-radius: $radius;
  -o-border-radius: $radius;
  -ms-border-radius: $radius;
  border-radius: $radius;
}
.border-radius {
  @include border-radius(10px);
}

@mixin box-shadow($size, $color) {
  -webkit-box-shadow: 0 0 $size $color;
  -moz-box-shadow: 0 0 $size $color;
  -o-box-shadow: 0 0 $size $color;
  -ms-box-shadow: 0 0 $size $color;
  box-shadow: 0 0 $size $color;
}
.box-shadow {
  @include box-shadow(10px, #121212);
}

$modal-width: 60%;
$modal-padding: 50px;
$background-color: #fff;

.transition {
  transition: 0.3s ease-in-out;
}

// Text options
$text-align: left;
$font-size: 16px;
$line-height: inherit;
$font-color: inherit;

// Link Options
@mixin button-radius($radius) {
  -webkit-border-radius: $radius;
  -moz-border-radius: $radius;
  -o-border-radius: $radius;
  -ms-border-radius: $radius;
  border-radius: $radius;
}
.button-radius {
  @include button-radius(6px);
}

$button-background: #555;
$button-font-color: #fff;
$button-font-size: 13px;
$button-font-style: uppercase;
$button-font-weight: 600;
$button-padding: 12px 26px;

.blocker {
  position: fixed;
  top: 0;
  right: 0;
  bottom: 0;
  left: 0;
  width: 100%;
  height: 100%;
  overflow: auto;
  z-index: 9998;
  padding: 20px;
  box-sizing: border-box;
  background-color: rgb(0,0,0);
  background-color: rgba(0,0,0,0.75);
  text-align: center;

  &:before {
    content: "";
    display: inline-block;
    height: 100%;
    vertical-align: middle;
    margin-right: -0.05em;
  }

  &.behind {
    background-color: transparent;
  }
}
.modal {
  display: inline-block;
  vertical-align: middle;
  position: relative;
  z-index: 2;
  max-width: $modal-width;
  box-sizing: border-box;
  background: $background-color;
  padding: $modal-padding;
  @extend .border-radius;
  @extend .box-shadow;
  text-align: $text-align;

  a.close-modal {
    width: 30px;
    height: 30px;
    line-height: 30px;
    text-align: center;
    position: absolute;
    font-size: 26px;
    font-weight: normal;
    top: 16px;
    right: 18px;
    @extend .transition;

    &:hover {
      opacity: 0.6;
      cursor: pointer;
    }
  }
  p {
    font-size: $font-size;
    line-height: $line-height;
    color: $font-color;
  }
  #modal-link a {
    background-color: $button-background;
    color: $button-font-color;
    font-size: $button-font-size;
    text-transform: $button-font-style;
    font-weight: $button-font-weight;
    text-align: center;
    transition: ease-in-out 0.5;
    padding: $button-padding;
    @extend .button-radius;
    display: inline-block;

    &:hover {
      opacity: 0.7;
      @extend .transition;
    }
  }
}

// Responsive fixes
@media screen and (min-width: 0px) and (max-width: 767px) {
    .modal {
      max-width: 100%;
      padding: 20px;
    }
}
(18 Comments)


Is there a way to implement a modal popup on click, versus by time? I’d like to implement this for multiple sections of the site. Thanks!
Hi Jackie, making it work on a click is fairly simple. Firstly you’d need to add the clickable element to the theme that is going to open the modal. Something like;
The “rel” tag will open the modal by ID and is simplest way to work with the default jQuery Modal plugin settings. This also means the js in step 4 would be redundant and no longer necessary, so you can remove it from your theme.
However, if you want a bit more control over the modal load, effect etc you’ll need to add a js function. something like;
The different options for this can be viewed on the plugin github page – https://github.com/kylefox/jquery-modal#options
Is there a way to adjust this to be cookie-based? I’d like to set it up so that the popup doesn’t appear every time the user goes to a new page.
Hi Debbie, yes, you should be able to do that by adding something like cookie.js – https://github.com/js-cookie/js-cookie
You’d need to add the js library to the theme and add a function that is fired based on the class you’ve given to the button to close the pop-up and however long you want the cookie to last. Something like;
Forgot to add that that will create the cookie, you’d then need to wrap the original js function within it to ensure that nothing happens if the cookie is active, something like
I seem to be having issues getting this to work on my theme. I’m using the exact method you describe above first, then I’m going to try to add the cookie element to it.
I keep getting a ‘TypeError: $ is not a function’ for this code:
$(document).ready(function() {
function showpanel(){
$(‘#modal’).modal({
// add the plugin options as required
fadeDuration: 600,
fadeDelay: 0.6,
closeText: ‘×’
});
}
setTimeout(showpanel, 2000) //set the delay time
});
Where in the header.php file should the get template part (‘modal’) go?
I’d just add the get_template_part anywhere after
. It doesn’t need to be in the header it can be in the page.php or footer.php.Check that the jquery Modal library script is actually loading. That’s most probably why the function returns an error. In the code above (step 3) it’s loading it in a function wrapped in a conditional tag based on the ACF field ‘Active’ being ‘yes’. It’s also assuming that you’ve added this file to a folder within your theme with a path of js/libs/jquery.modal.min.js
If you extend it to include the cookie the best thing would be to add that script to the WP function (step 3) and then use the two js functions I posted in the last comments as an edit to step 4. (also remember to remove the if(is_frontpage()) conditional if you want it to appear on any page.
You need to wrap the modal function within the cookie function as that is the parameter you want to use to determine whether the modal shows.
Hey, the json file is missing from your dropbox (404). Will this still work without it? Or could you re-upload it, please?
Hi Nate, I’ve re-uploaded the json file. Without it, all you would have needed to do was recreate the fields again in ACF and make sure that the names match.
How would you add Previous and Next buttons to navigate through several enlarged modals on the page? The reason is so you don’t have to keep closing them and clicking to open a new one…it makes it one less click.
Not sure I understand completely what you’re trying to achieve, but the simplest way would probably be to add some form of carousel to the model content, that way you’d be able to navigate through various sets of content.
Hi,
can you help me to implement a step modal like this? Click “See details and apply”
https://bendingspoons.com/careers.html
Hi Sergio, this example is fairly straight forward. For a page with multiple modals you just need to make sure that each modal has a unique #id (i.e. id=”modal-1″, id=”modal-2″ etc). That way you can then set-up specific links to specific modals. You will also need to update the js code to remove the function working on ‘#modal’ and use the class name ‘.modal’ instead to make it a universal function and not #id specific.
What if I am trying to activate this on a page that is not the front/home page?
Hi Tonya, you just need to remove or update the conditional tag “if(is_front_page())”. This determines that it only loads on the front page, so if you wanted it on every page you’d use “if(is_page())”, posts only “if(is_single())” etc… You can find out more here – https://developer.wordpress.org/themes/basics/conditional-tags/
My wordpress theme i am adding this modal to, doesn’t seem to have the options menu on the wordpress dashboard.? I’m fairly new to Wordpress development, but do you have a source to creating the options menu or suggestion to my issue?
Hi Jeffrey, I haven’t looked at this post in pages. However, there might of been an issue with the post images missing. I’ve fixed this which might clear things up a bit for you.